Developing production pipelines
This guide describes how to obtain a copy of a production pipeline with the intention to edit it and contribute the changes back to the upstream repository. To develop a whole new pipeline from scratch, refer to Working with the template pipeline.
Production pipelines are subject to change over time, following updates to dependencies and best practices in the field. Contributions to production pipelines can be made directly on the repository, or through pull requests from forks of the repository.
Getting started
Preparing your project on GitHub
To start, sign in to GitHub and navigate to the repository of the production pipeline, e.g. pipeline_rnaseq_hisat2, where you will see a grey button Fork in the top-right corner of the page.
Click it to open a modal window that will ask you where you want to fork that repository.
Select your GitHub username, or something suitable for a tutorial project.
This will generate a new repository on your personal account (or the one of your choosing). This is the repository you will use to work on the pipeline and prepare pull requests to the upstream repository, and it contains the following files and sub-directories:
.github/workflows/build.ymlSub-directory that contains instructions for GitHub Action workflows. In most cases, you will leave it untouched; however, you may need to occasionally update it with fixes, or to add new custom steps (e.g., download additional test input files to test new steps in the pipeline).
config/Sub-directory that contains configuration files for controlling the execution of the pipeline. Configurable settings may range from options passed on to programs called in individual tasks, to tabulated metadata about input files. You will update files in that folder with values that match your updates to the pipeline. Updates range from editing existing values, to adding or removing fields that control new or deprecated parameters of the pipeline controlled by users.
data/Sub-directory where users will download the input FASTQ files for this guide. In most cases, you will leave this untouched, as the pipeline is automatically tested by GitHub Action workflows triggered by every new commit pushed to a pull request on the GitHub repository. You might occasionally decide to set up test input files in this sub-directory, to test the pipeline on your local computer, in which case you will be careful not to commit those data files to Git!
envs/Sub-directory that contains YAML files describing Conda environments for running or testing the pipeline. You may update those files when identifying new dependencies required by your updates to the pipeline, or removing deprecated dependencies required by software that is not used anymore following updates to the pipeline.
etc/Sub-directory that contains additional files needed specifically for continuous integration. You will update the file
etc/ci_checks.shto add or remove the path to expected output files following updates to the pipeline. This file is used to verify that all the expected files are present at the end of the pipeline run during the GitHub Action..gitignoreGit configuration file used to ignore files to stage and commit, you will leave it untouched.
README.mdBasic description of the repository. You will edit it as you see fit.
pipeline.pyPython script that describes the pipeline steps and overall workflow. You will edit this file with updates to the existing pipeline tasks, and possibly extend the pipeline with new tasks or remove deprecated functionality.
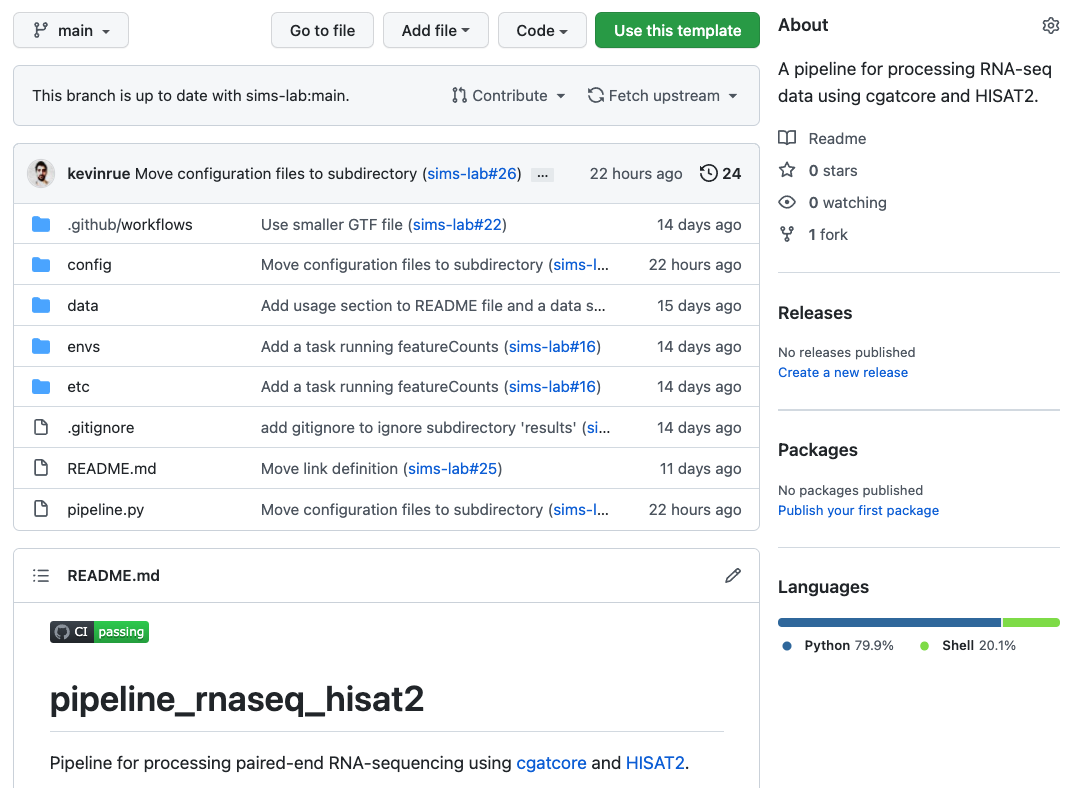
Production pipeline forked on GitHub
First steps
Triggering the first build
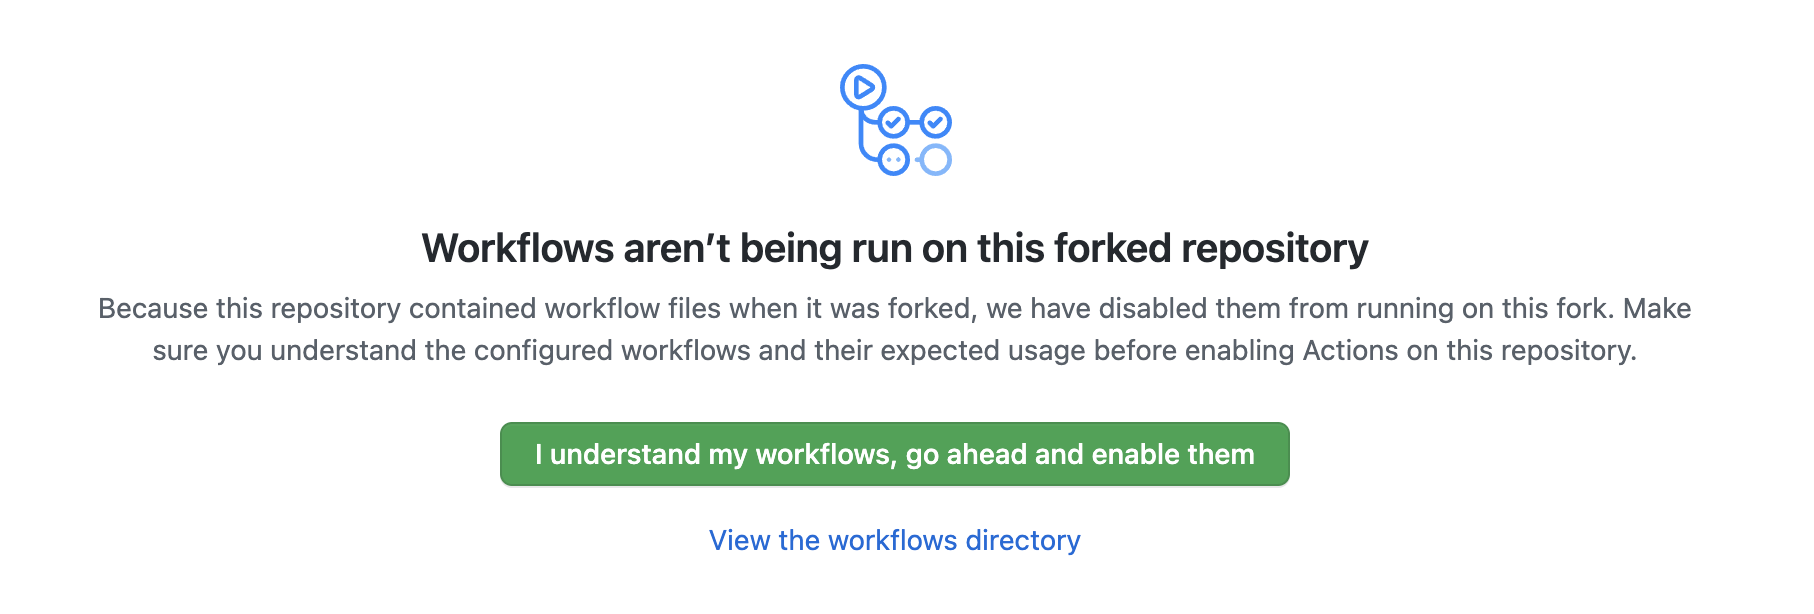
View before enabling GitHub Action runs on a fork
GitHub will automatically detect GitHub Action workflows in your project, but on forked repositories it requires you to explicitly allow them to run, for security reasons.
Click on the green button I understand my workflows, go ahead and enable them. This will take you to the “Actions” page of the repository, where you will find the list of workflows (one workflow) and workflow runs (empty so far).
Click on the workflow CI, in the left pane.
On the right, click on the grey button Run workflow, leave
mainas the selected branch, and click on the green button Run workflow.
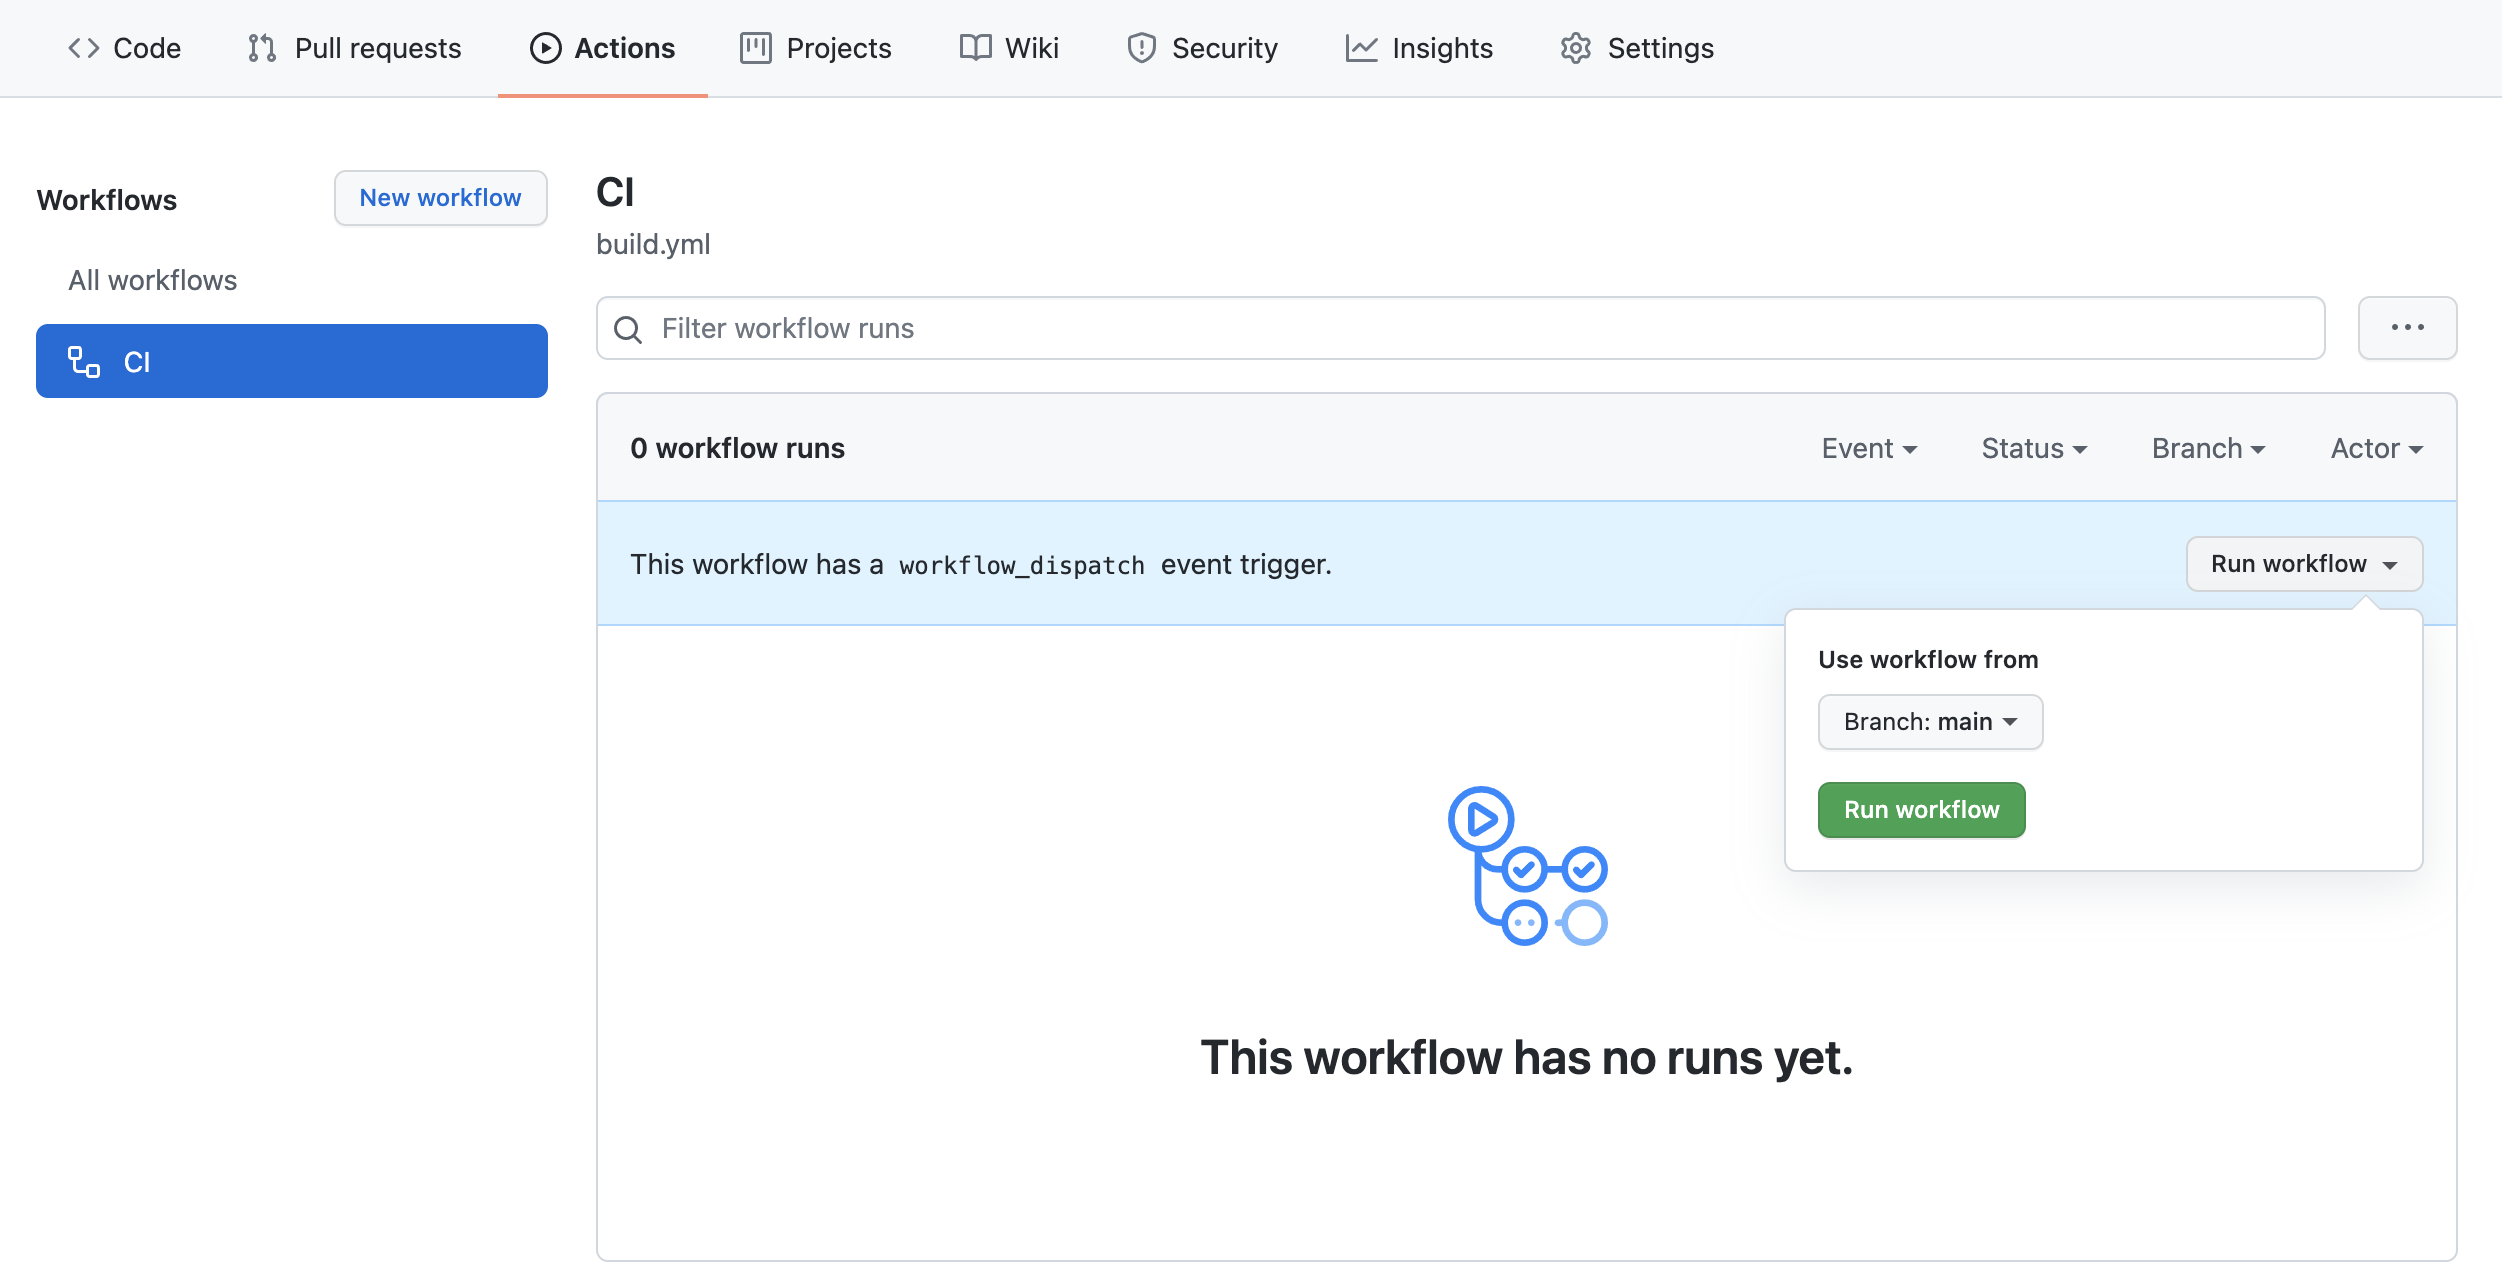
View before enabling GitHub Action runs
After a few seconds, an entry will appear in the main panel, representing the first run of the workflow.
To see the build logs, click on the title of the workflow run.
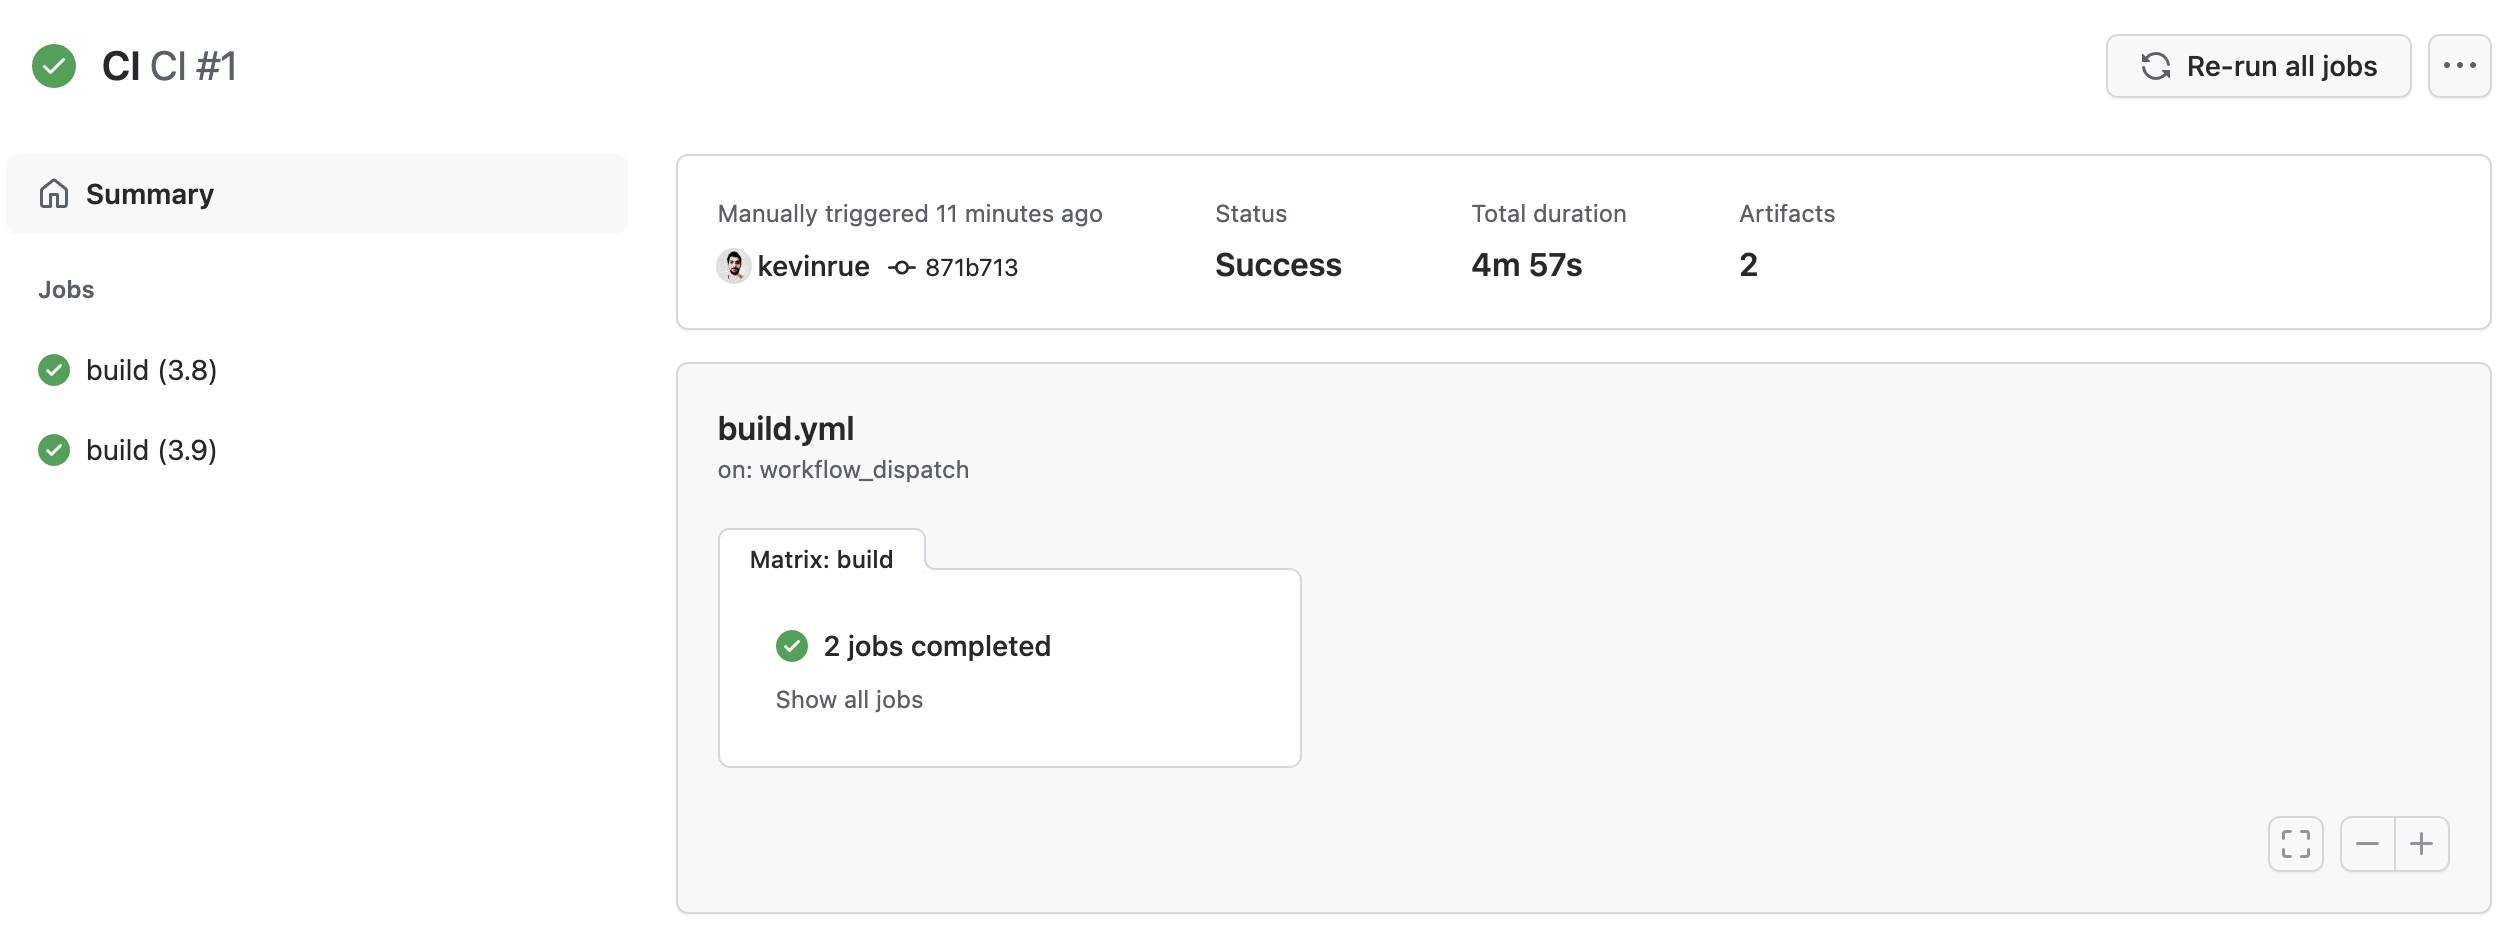
First successful build
When the build finishes, you will see a green indicator (red in case of failure), the status of the build, the elapsed time, and download links to artifacts that contain the output files generated by the pipeline. If you now click on any of the build jobs, you will see the full logs of commands run during the GitHub Action workflow, and their outputs.

Logs of a GitHub Action workflow run
Note
The logs of GitHub Action workflows are extremely valuable in the case of failure, for debugging and fixing the pipeline (or the GitHub Action workflow itself). Some of the steps in the workflow report information about the Conda installation, and the environment in which the workflow is executed.
When continuing development on the fork of a production pipeline, it is entirely normal to occasionally run into build failures, as you test new code or bug fixes. However, it is crucial that you do every effort to restore a successful build, as this is an absolute requirement to merge a pull request to the upstream repository. In doubt, contact the maintainer of the upstream repository for help and advice (e.g., open a Github issue on the upstream repository).
Proposing changes
Once you have identified a feature that you wish to add to the pipeline template, or a bug that you wish to fix, create a branch in your fork of the repository.
Note
Working on branches allows you to experiment with new code and functionality without polluting the main branch of the repository with unnecessary commits representing all your invididual attempts to implement your idea.
If your idea does not work out, you can simply remove the branch from your fork; this will discard your work on that one branch, keeping everything else nice and tidy.
If you idea did produce code that is worth integrating into the upstream repository, you can open a GitHub pull request on the upstream repository; this will merge the updates on your branch to the main branch of the upstream repository, which you can subsequently pull into the main branch of your fork… before creating another branch to work on another new feature!
To demonstrate this, navigate to your GitHub fork, locate the file README.md,
and click the pencil icon on the top-right with the tooltip “Edit this file”
to open a web editor.
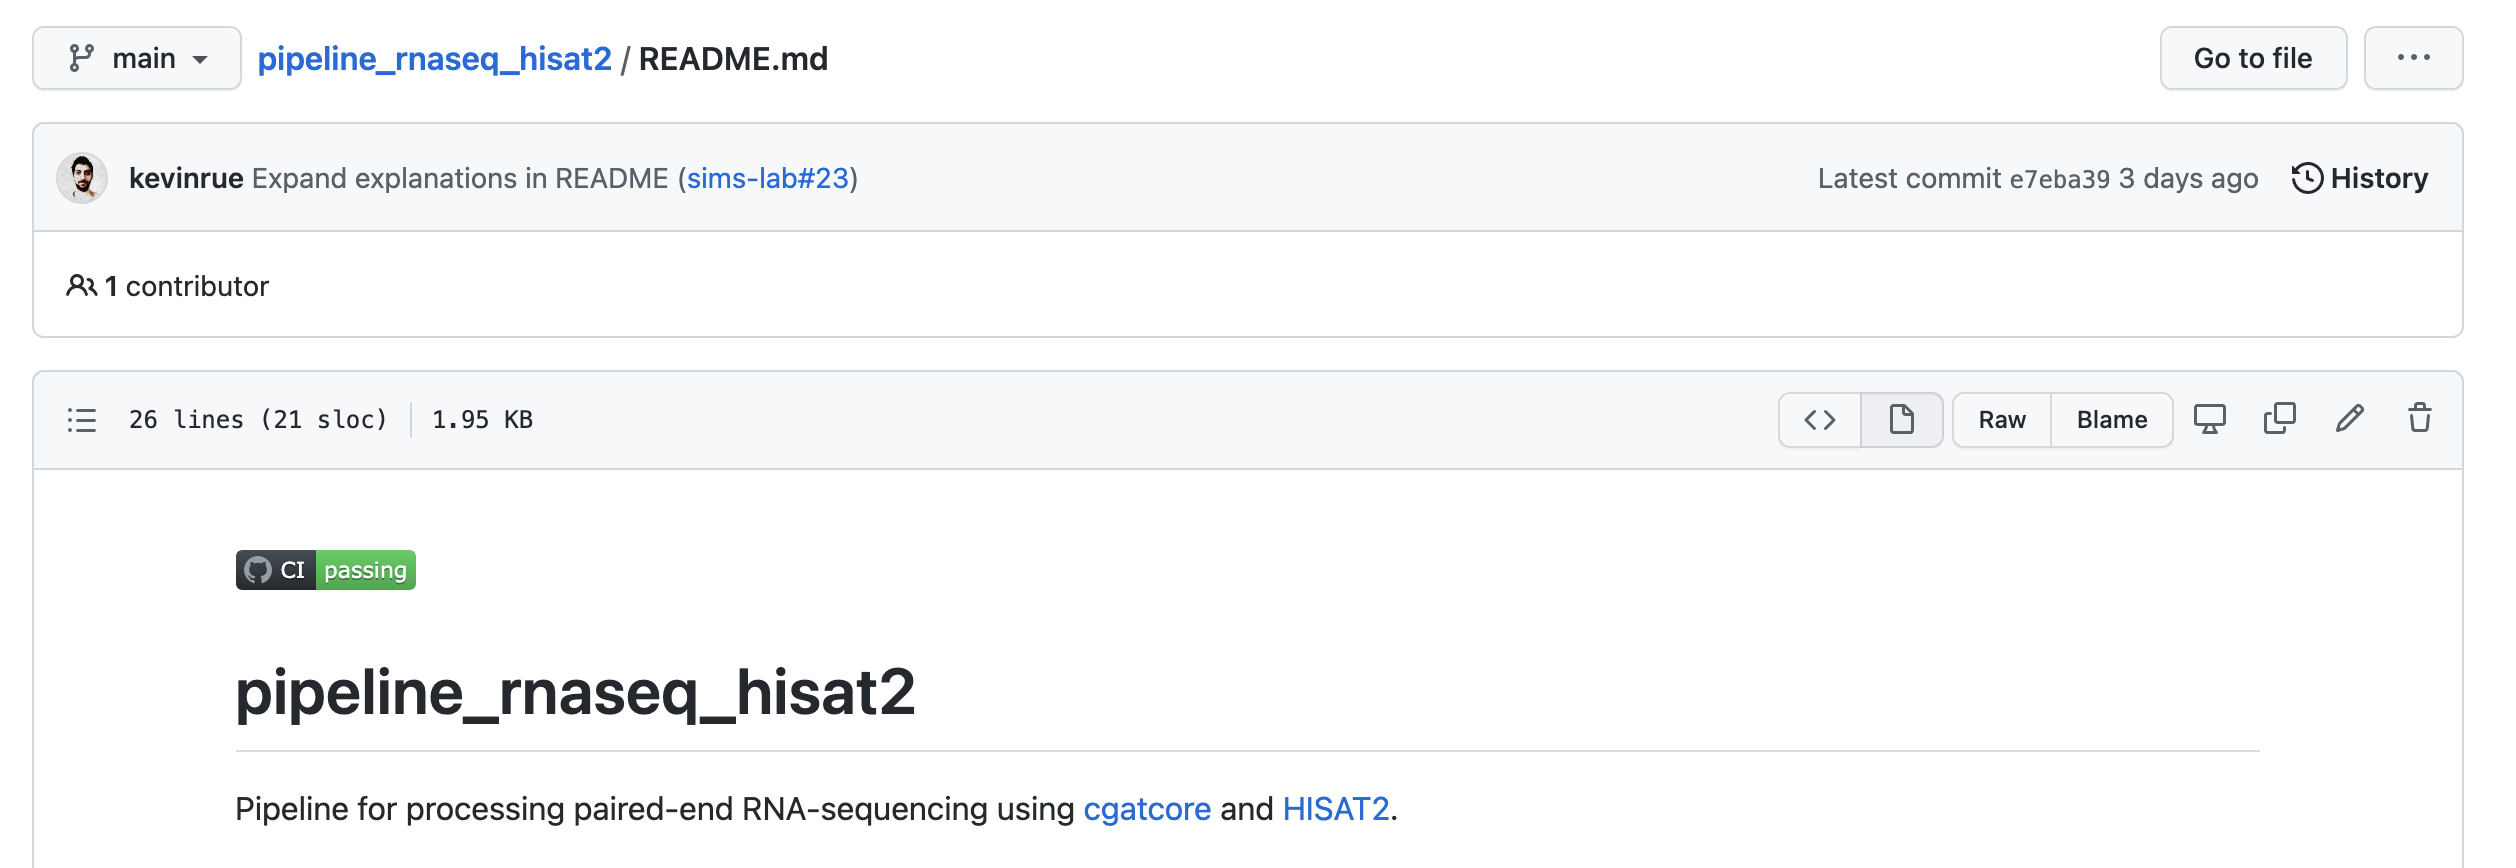
File view on GitHub before launching the editor
In the editor, add the line:
This is a fork of a production pipeline.
Write an appropriate commit message,
and choose the “Create a new branch for this commit and start a pull request” option,
typing a name for the new branch (e.g. tutorial).
When you are done, click the green Propose changes button,
which will take you to the new pull request page.
However, once there, do not submit the form; instead, navigate back to the main page of your fork.
In the top-left corner, select the branch that contains your work.
Next, click the dropdown menu Contribute.
In the modal that appears, click the green button Open pull request.
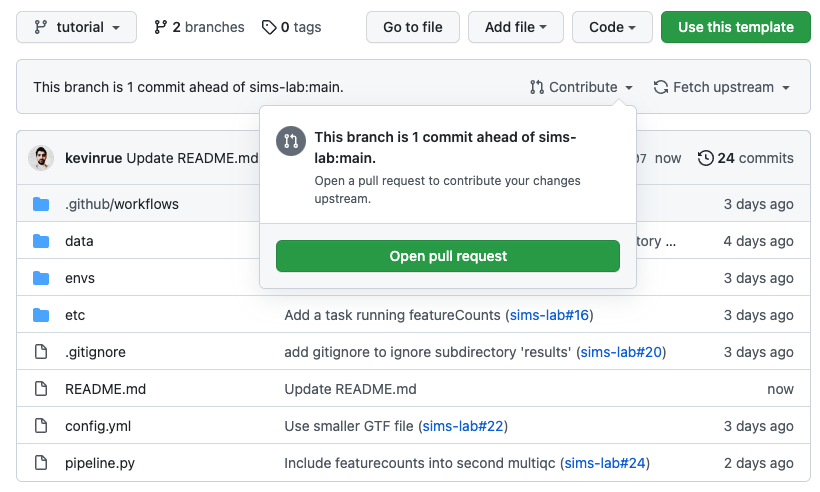
Opening a pull request between a fork and an upstream repository
This will take you to pull request between the branch in your repository and the main branch of the upstream repository.
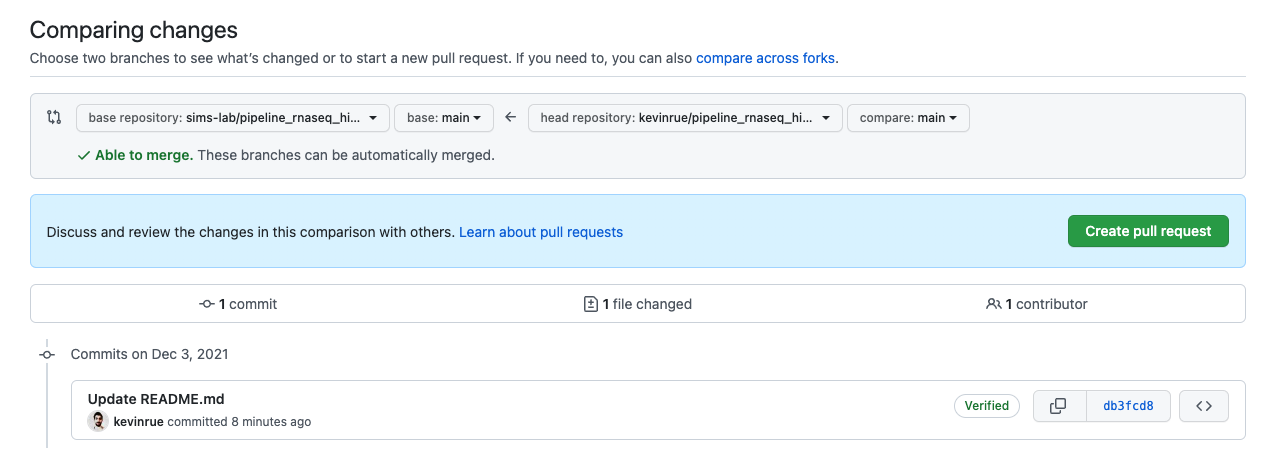
View before submitting a pull request to the upstream repository
Scroll down to inspect the proposed changes, type a suitable title to describe your pull request (optionally leaving a comment in the larger text box for a more detailed description), and click the green button Create pull request.
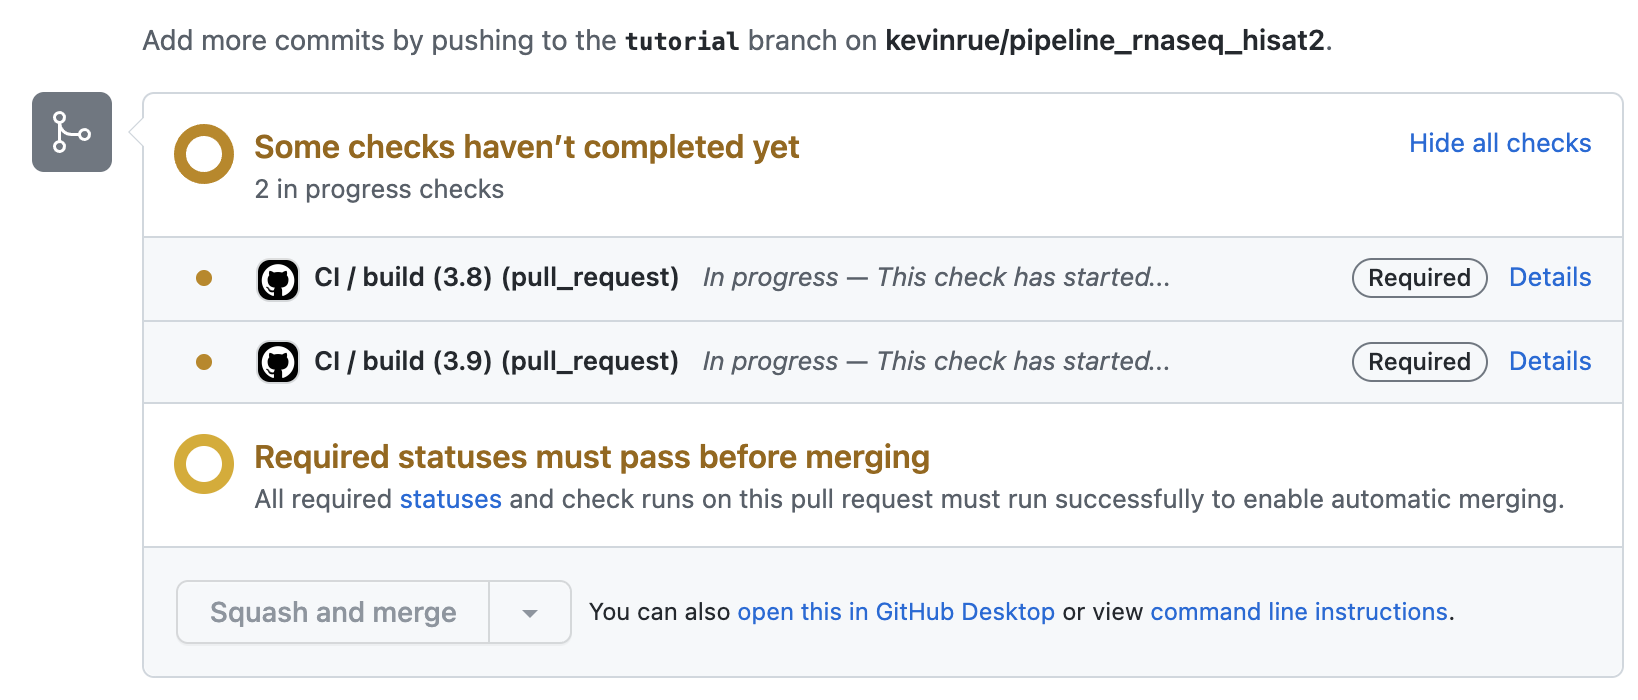
GitHub Action building the pull request
After opening the pull request, one or more GitHub Action checks will appear (depending on the number of status checks that the upstream repository has in place). A yellow icon indicates that the workflow is running, while green or red icons indicate successful completion or failure, respectively. If you click on the Details link – while it is running or after completion – you will access the build logs.
When the status checks pass and the maintainer of the upstream repository is satisfied, they will be able to merge the pull request.
Note
We recommend the “Squash and merge” strategy for merging pull requests, as this maintains prevents merge commits from being pushed to the main branch of the repository, keeping a linear history in the Git log that is much easier to read in the future.
Moreover, the “squash” part of the process collapses all the commits on the branch proposing the changes into a single commit on the upstream repository. Again, this will make it a lot easier to read, summarised, and interpret changes brought in by individual pull requests without navigating a large number of commits. It also makes it easier to revert the changes brought in by a pull request, without undoing every single commit on that branch.

Deleting a branch after a pull request
When the pull request is merged, navigate to the page of the pull request on the upstream repository and click on the Delete branch button to delete the branch from your repository.
Note
Once a branch is merged, it does not have any more value to keep around, and only clutters your own repository, making it increasingly difficult to identify branches that you are actively working on.
Updating your fork
Having merged the pull request to the main branch of the upstream repository, your own fork is now out of date as the changes do not automatically propagate to the main branch of your fork. This is also the case when pull requests made by other contributors are merged to the upstream repository. It is always a good idea to check whether the upstream repository has been updated since your last visit, every time that you work on your fork.
To bring the latest updates from the upstream repository into your fork:
Navigate to the main page of your fork.
Click the dropdown menu Fetch upstream.
In the modal that appears, if your fork is out of date, you will see a green button Fetch and merge. Click on it.
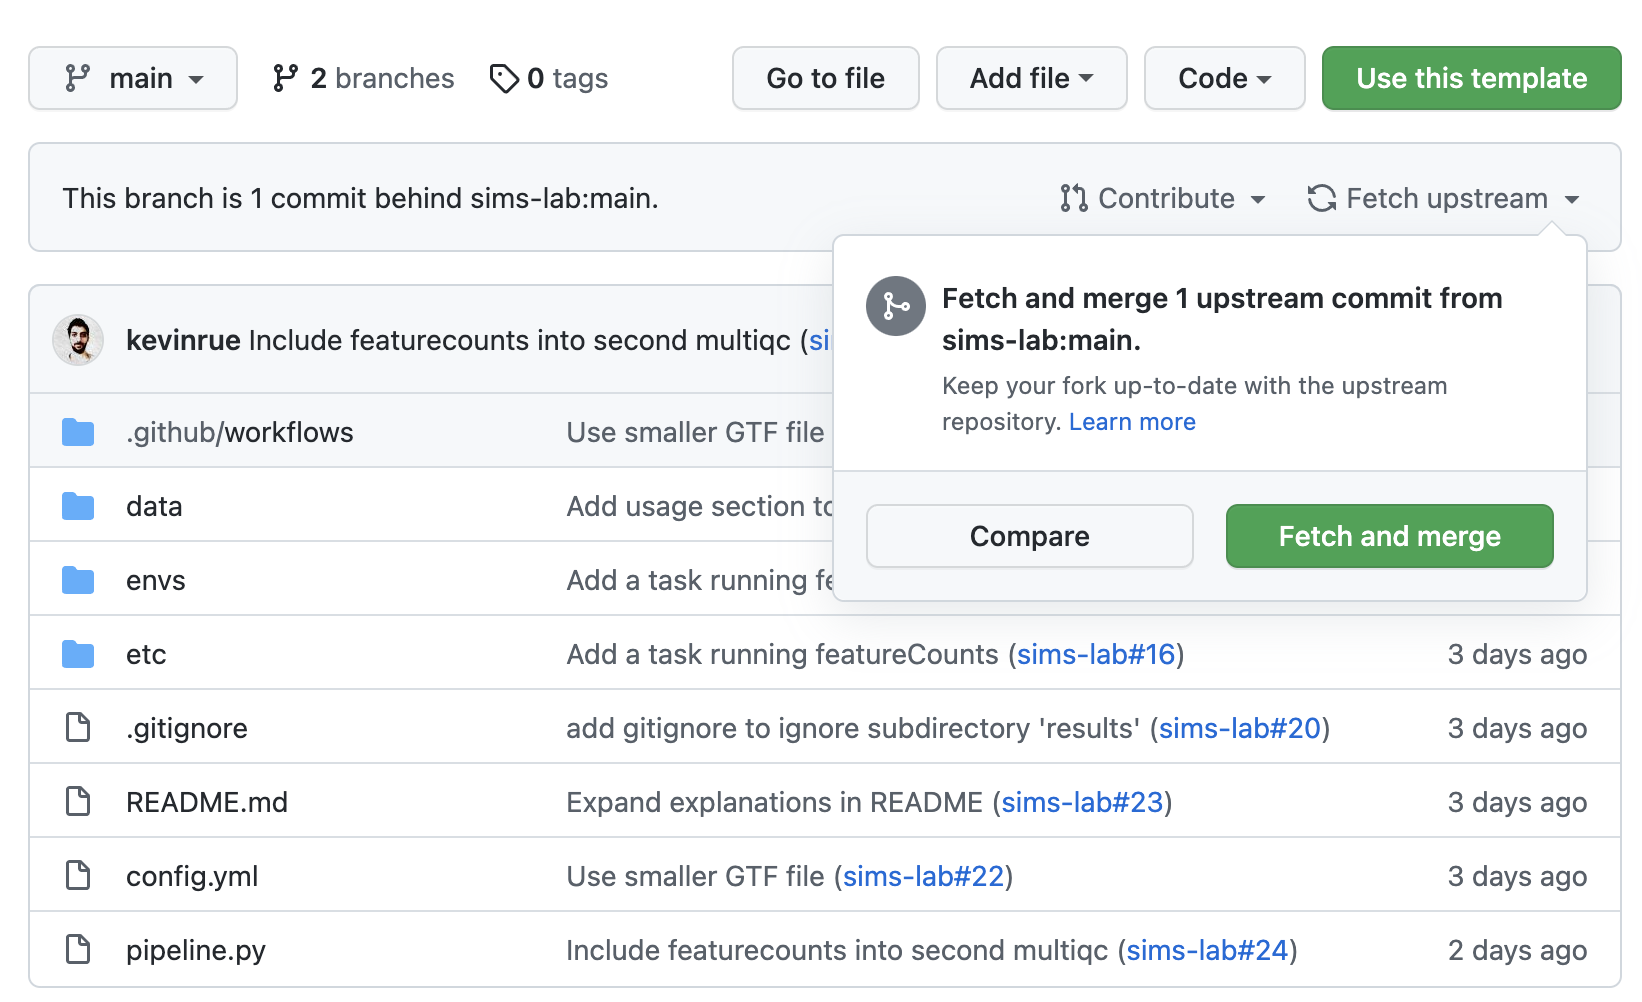
Fetching commits from an upstream repository to update a fork
Where to go from here
This is the end of the guide. You started by making a fork of the production pipeline as a new repository on GitHub, created a branch to work on a feature or a bug fix, and made a pull request that passed continuous integration before being merged by the maintainer of the upstream repository. Then you deleted your branch and fetched the updated code from the upstream repository into your fork.
More resources will be added shortly to this documentation to continue learning about the Sims-lab pipelines:
Working on pipelines locally with Git
Best practices and recommendations
Code styling
Documentation
… and more!